A garage door cable doesn’t fray randomly along its length. In my seventeen years of cable repairs, the damage is in the same spot almost every time: right where the cable passes through the bottom bracket, where it wraps around the pulley, and sits lowest to the floor.
This isn’t a coincidence. There’s a specific mechanical reason it happens there, and it’s made worse by Chicago’s alley climate. Here’s what you need to know.
Why cables matter
The lift cables on a garage door run from the bottom bracket at each side of the door, up and around a pulley at the top of the track, and then across to the cable drum mounted on the torsion shaft. When the spring unwinds and rotates the shaft, the drums reel in the cables, which pulls the door up.
The cables keep the door level. Without them, or with one side failed, the door falls on the unfailed side and jams hard. A snapped cable under full spring tension releases that tension rapidly. The door drops, and it drops fast.
This is why a fraying cable is not a “monitor it” situation. It’s a replace-it-now situation.
The mechanical reason it fails at the bracket
The bottom bracket is the attachment point where the cable connects to the door. Here’s what’s happening at that point geometrically:
When the door is closed, the cable runs nearly vertical, straight up from the bottom bracket to the pulley overhead. But the cable isn’t just sitting in the bracket; it’s looped through a fitting or a swaged end that clamps into the bracket slot.
Every time the door opens, that cable transitions from taut-and-straight to reeled-and-coiled. The angle at the bracket changes from close to 90 degrees to almost flat. The cable bends around the bracket fitting on every cycle.
That repeated bending, at the same point, every time, for thousands of cycles, causes metal fatigue. Wire strands develop micro-fractures at the bend point. The outermost strands fail first (they have the tightest bend radius), and you see fraying, individual wires separating from the main cable body.
It’s exactly the same reason a wire coat hanger breaks when you bend it back and forth repeatedly. The metal doesn’t fail from tension; it fails from flexion fatigue at the same point.
Why Chicago alleys make it worse
Standard galvanized aircraft cable has excellent corrosion resistance under normal conditions. But Chicago alley garages create a specific corrosion environment:
Salt and road chemical migration. From November through April, city alley trucks spray salt brine ahead of plowing. Cars track this brine into garages on their undercarriages and tires. It pools at the garage floor, exactly where the bottom bracket sits. Salt is an accelerant for cable corrosion. It eats into the galvanizing layer first, then attacks the steel wire braid underneath.
Water pooling at the bracket. The bottom bracket is at floor level in a space that sees rain, snowmelt, and tire splash. In many alley garages, the concrete floor drains poorly or pitches slightly inward. Water sits at the bracket base.
Temperature cycling. Cable steel expands and contracts with temperature. In a Chicago winter, the expansion differential between a cold morning and a warm afternoon can add tens of cycles’ worth of fatigue stress to the cable over a season.
The result: cables in Chicago alley garages typically reach failure-level fraying in 5 to 7 years, even when the torsion springs are still fine. Newer suburban garages with better drainage and less salt exposure can go 10 to 12 years.
What fraying looks like at early stage
You don’t need to be a tech to spot this. Safe inspection from the floor:
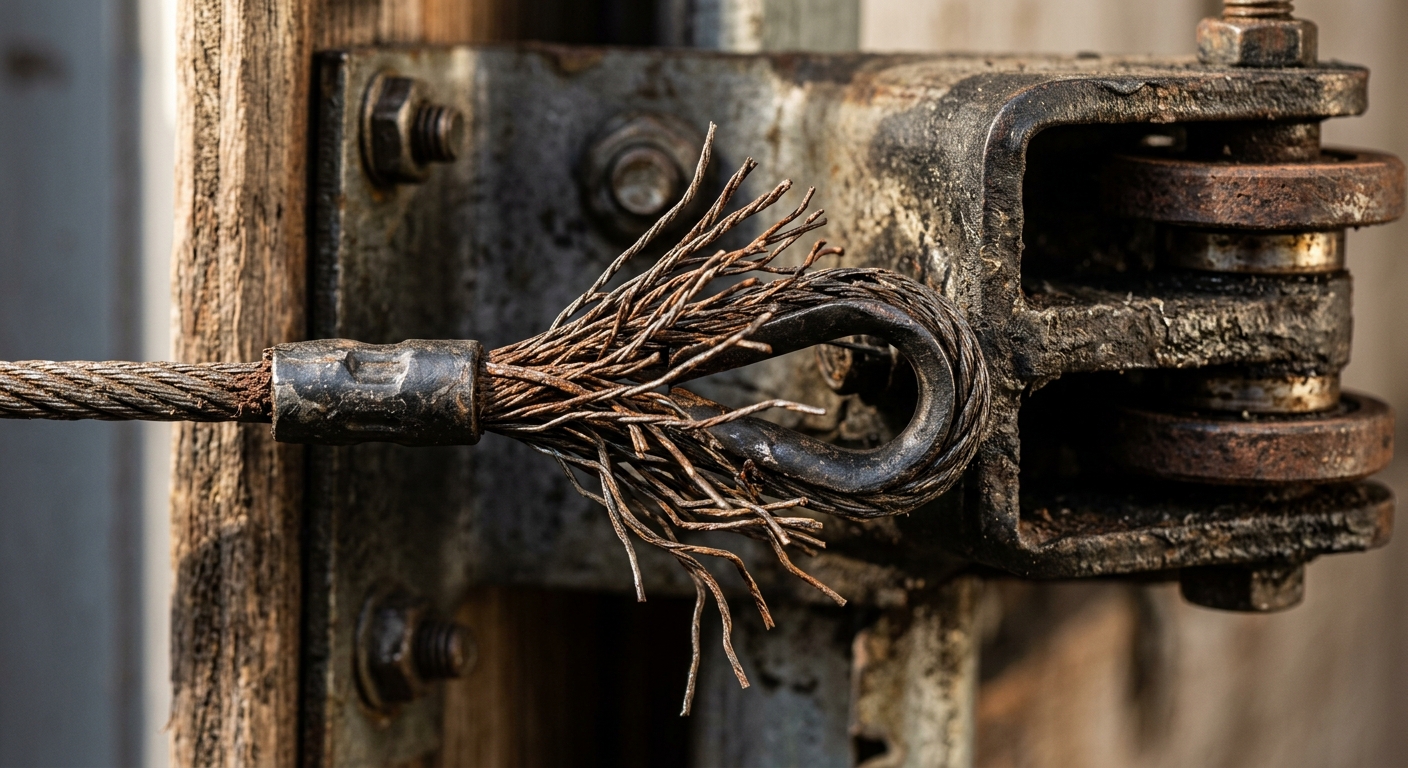
Early stage (addressable, book service): You can see individual wire strands separating from the main cable body near the bracket. The cable still looks mostly intact but has a “fuzzy” section where some strands have broken free. No visible kinking of the main cable.
Mid-stage (schedule immediately): Multiple strands broken, the cable has visible distortion or kinking near the bracket. One side of the cable may look slightly thinner than it should. At this stage, failure is a matter of days to weeks.
Late stage (do not operate the door): More strands are broken than intact at the failure point. The cable may be visibly unraveling. Disconnect the opener and call us. Operating the door at this stage risks a complete snap during the cycle.
Important: look at both sides. Cable wear is usually more advanced on one side (the high-use side in terms of the specific angle each cable travels), but both should be inspected.
The DIY mistake that makes it dangerous
I’ve arrived at calls where homeowners have wrapped electrical tape around a fraying cable section. I understand the instinct, the tape holds the fraying wires together so the cable keeps working.
Here’s the problem: tape adds zero tensile strength. The individual wire strands are fraying because they’re broken. The tape does not reconnect broken steel wire. What it does is hide the failure from visual inspection. You can’t see how bad the damage is beneath the tape, and you can’t tell when the remaining strands reach their limit.
Don’t splice, don’t tape, don’t braid the loose strands back in. A fraying cable needs replacement, not first aid.
What a proper cable replacement involves
Cable replacement is a two-person job for a reason. One person holds the door at mid-height while the other releases spring tension and removes the cable from the drum.
Here’s the process:
- Release spring tension to zero using winding bars. This is step one, always. Working on a door under spring load is how serious injuries happen.
- Disconnect the opener. We don’t want an automated cycle starting mid-repair.
- Anchor the door at mid-height so it can’t drop while one cable is detached.
- Remove the cable from the drum and unthread it from the pulley. The cable end is typically looped or swaged, so it detaches from the drum slot.
- Remove the cable from the bottom bracket by releasing the end fitting.
- Install new cable. We use 7×19 strand stainless aircraft cable, 19 smaller wires bundled into 7 strands for flexibility and fatigue resistance. The 7×19 construction tolerates the bending cycle at the bracket better than 1×19 or 7×7 cable.
- Thread through pulley, attach to drum, and reel to correct tension.
- Always replace both cables. The cable that hasn’t visibly frayed is at the same cycle count as the one that failed. It will fail soon. Replacing both is not optional in our shop. It’s how we protect our warranty.
- Re-tension spring, rebalance door, test balance with the door at waist height, run three full cycles.
Cost and same-day service
Cable replacement is a flat-rate job. We’re usually on-site same day for cable calls. They’re common, we stock the cable on every truck, and the repair takes 60 to 90 minutes.
If both cables need replacement (almost always), the cost includes both, all hardware, and a balance test. We won’t quote you one cable and call you back with a second bill.
Cable fraying is one of the easier repairs to catch early. If you see anything fuzzy or distorted near the bottom bracket of your door, call us before it becomes a door-drop situation. +1 (312) 418-2970.